4월 1주차 Weekly Report
Table of contents
- 주간 작업 내용
- Flutter - Pico 양방향 통신 개발
- 데이터셋 전처리 / 수면단계 모델 학습
- 데이터셋 전처리
- 전처리 결과 및 그래프
- 학습 및 결과
- flutter 환경에서 tflite 파일 이식하기
- To do
주간 작업 내용
4월 1주차 작업내용이다. 팀원별 업무 내용은 다음과 같다.
박종현 : Flutter - Pico 양방향 통신 개발
이제욱 : 데이터셋 전처리 / 수면단계 모델 학습
이태우 : Flutter 환경에서 TFLite 파일 이식
-
04.02(화) 17:30 ~ 22:00 : TFLite 환경 이식 가능한 모델 탐색 / 데이터셋 탐색 / TFLite 연산자 문제 분석 / 블루투스 스터디
-
04.04(목) 21:00 ~ 02:00 : Flutter to Pico 코드 작성 및 분석 / 데이터셋 전처리 / Flutter 환경 TFLite 파일 이식 문제 분석
-
04.06(토) 14:00 ~ 02:00 : Flutter to Pico 코드 작성 및 분석 / 데이터셋 전처리 / Flutter 환경 TFLite 파일 이식 문제 분석 완료 및 다른 모델 탑재 가능 확인
-
04.07(일) 14:00 ~ 20:30 : Flutter to Pico 블루투스 양방향 통신 테스트 / 수면단계 모델 학습 및 분석
Flutter - Pico 양방향 통신 개발
지난 주에 테스트했던 피코 모듈과 Flutter 기반 BLE 통신을 기반으로 이를 응용하여 최종적으로 Flutter-Pico 간 BLE 통신 개발을 진행하였다.
구조 설명
기본적으로 라즈베리파이 피코에서는 MicroPython으로, 앱에서는 Dart기반 Flutter로 스크립트를 작성하였으며, 두 플랫폼이 BLE로 통신하는 과정을 도식화 해보면 다음과 같다.
- 피코측에서 BLE Advertisie 진행.
- Flutter 앱에서 주변 BLE 기기들을 Scan하고, 발견된 피코 디바이스와 Connect 진행. (이때 디바이스의 구분자는 MAC 주소 혹은 서비스 UUID로 진행한다.)
- 피코는 Flutter에서 요청한 Connect 요청을 수락하고, 미리 설정해두었던 두가지 캐릭터리스틱(송신, 수신)을 등록하여 통신을 시작한다.
- Flutter는 연결이 완료되면 피코로부터 서비스를 제공받는데, 서비스 내의 캐릭터리스틱은 미리 설정해두었던 두가지 캐릭터리스틱의 UUID(송신의 UUID, 수신의 UUID)혹은 미리 설정해두었던 Flag로 구분하여 피코로부터 들어오는 값(Rx Value)는 별도로 저장하거나 화면에 띄운다. 반대로 보내는 값(Tx Value)는 write 기능을 이용하여 키보드로 입력한 값을 피코로 데이터를 전송한다.
MicroPython(Pico)
지난주에 작성하였던 advertise_payload 함수를 이용하여 advertise를 진행하여 자신의 MAC 정보와 서비스, 캐릭터리스틱 UUID 정보를 넘긴 뒤에, 이를 인식한 Flutter 앱과 Connect하여 값을 주고받는 코드를 작성했다.
- read_write_ble.py
import bluetooth
import random
import struct
import time
from machine import Pin
from ble_advertising import advertising_payload
from micropython import const
## 플래그 선언
# 장치 연결 이벤트
_IRQ_CENTRAL_CONNECT = const(1)
# 장치 연결 해지 이벤트
_IRQ_CENTRAL_DISCONNECT = const(2)
# GATT를 이용한 데이터 write 이벤트
_IRQ_GATTS_WRITE = const(3)
_FLAG_READ = const(0x0002)
_FLAG_WRITE_NO_RESPONSE = const(0x0004)
_FLAG_WRITE = const(0x0008)
_FLAG_NOTIFY = const(0x0010)
_FLAG_INDICATE = const(0x0020)
## UUID 설정
# 캐릭터리스틱 선언
# 상대방이 읽을 수 있도록 Read, Notify 활성화를 위해 플래그도 선언
_UART_TX = (
bluetooth.UUID("6E400003-B5A3-F393-E0A9-E50E24DCCA9E"),
_FLAG_READ | _FLAG_NOTIFY,
)
# 상대방이 쓸수 있도록 Write, 무응답쓰기도 지원하도록 플래그 선언
_UART_RX = (
bluetooth.UUID("6E400002-B5A3-F393-E0A9-E50E24DCCA9E"),
_FLAG_WRITE | _FLAG_WRITE_NO_RESPONSE,
)
# 서비스 UUID 선언
_UART_UUID = bluetooth.UUID("6E400001-B5A3-F393-E0A9-E50E24DCCA9E")
_UART_SERVICE = (
_UART_UUID,
(_UART_TX, _UART_RX),
)
## =====================
class BLESimplePeripheral:
def __init__(self, ble, name="mpy-uart"):
## BLE 모듈 생성
self._ble = ble
self._ble.active(True)
self._ble.irq(self._irq)
# GATT 서비스 등록 - 수신, 송신 핸들러
((self._handle_tx, self._handle_rx),) = self._ble.gatts_register_services((_UART_SERVICE,))
self._connections = set()
# 상대방이 쓰기 작업시 콜백 이벤트 함수
self._write_callback = None
self._payload = advertising_payload(name=name, services=[_UART_UUID])
self._advertise()
# 이벤트 콜백 함수
def _irq(self, event, data):
# 연결 성공 시,
if event == _IRQ_CENTRAL_CONNECT:
conn_handle, _, _ = data
print("New connection", conn_handle)
self._connections.add(conn_handle)
# 연결 실패 시, advertise 진행
elif event == _IRQ_CENTRAL_DISCONNECT:
conn_handle, _, _ = data
print("Disconnected", conn_handle)
self._connections.remove(conn_handle)
self._advertise()
# 쓰기 이벤트 발생 시(상대 디바이스가 데이터 송신 시)
elif event == _IRQ_GATTS_WRITE:
# 데이터 수신시 두 개의 핸들러가 고정되는데, 이는 캐릭터리스틱 별로 값이 고정되어 있다.
# 예시로, 내 스마트폰과 연결시 value_handle은 2개의 RX 캐릭터리스틱에 대하여 12와 14의 고정값을 지닌다.
conn_handle, value_handle = data
value = self._ble.gatts_read(value_handle)
# 쓰기 이벤트 콜백 함수 호출 파트
if value_handle == self._handle_rx and self._write_callback:
self._write_callback(self._handle_rx, value)
# 패킷 전송 함수
def send(self, data):
for conn_handle in self._connections:
self._ble.gatts_notify(conn_handle, self._handle_tx, data)
# 패킷 수신 콜백 함수 지정
def on_write(self, callback):
self._write_callback = callback
# 연결 여부 확인 함수
def is_connected(self):
return len(self._connections) > 0
# 지정된 인터벌마다 advertise 진행
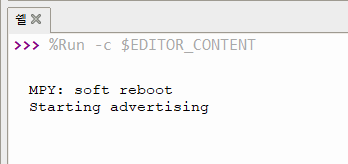
def _advertise(self, interval_us=500000):
print("Starting advertising")
self._ble.gap_advertise(interval_us, adv_data=self._payload)
def demo():
# 피코 LED 핀 지정
led_onboard = Pin("LED", Pin.OUT)
ble = bluetooth.BLE()
p = BLESimplePeripheral(ble)
# 값을 받을 시 출력하도록 함수 설정
def on_rx(value_handle, v):
print(value_handle)
print("RX : ", v)
# Rx 수신 시 이벤트 함수 지정
p.on_write(on_rx)
i = 0
while True:
if p.is_connected():
# 연결되었을 경우 LED를 키며 0부터 카운트를 하나씩 늘려나감.
led_onboard.on()
for _ in range(1):
data = str(i) + "_"
print("TX", data)
p.send(data)
i += 1
time.sleep_ms(1000)
if __name__ == "__main__":
demo()
Flutter(Application)
최종적으로 Flutter에서 BLE 통신을 위해 사용한 패키지는 Flutter_blue_plus 이다. MicroPython으로 작성한 BLE 통신코드와 굉장히 유사하며, BLE 통신의 기본인 Scanning, Connection, Subscribe까지 직관적인 API가 장점이었기에 선택하였다.
아래에서 위젯 디자인부터 프로바이더 및 라이브러리 이용을 위한 블루투스 세팅 등의 자세한 코드가 많지만 핵심 코드만 추려서 설명하도록 하겠다. (현재 코드에서 사용중인 유일한 상태관리 기법은 Provider이며, ChangeNotifier 기반의 SensorDataProvider를 생성하여 사용중이다. 자세한 코드는 깃허브에 업로드 하였음.)

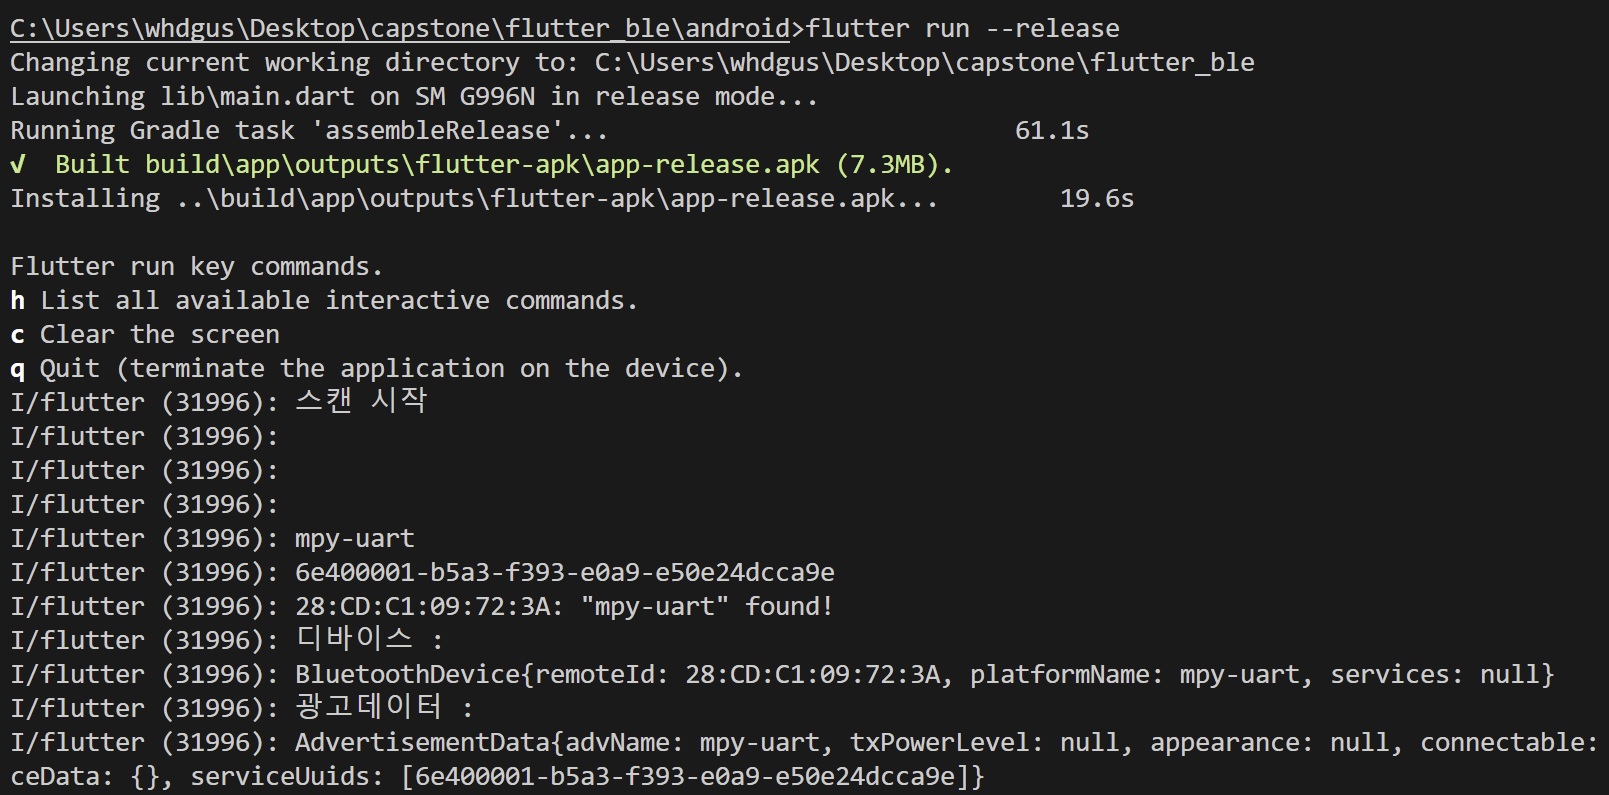
- Scan
주변에서 advertise를 수행하는 BLE 기기들을 검색하는 함수이다. startScan시 스캔이 시작하여 미리 지정한 서비스 UUID를 지니는 서비스를 검색하고, 이에 해당하는 디바이스를 피코 디바이스로 인식한다. 이후 해당 디바이스 정보를 저장하였다가 connect_device 함수를 이용하여 디바이스와 페어링을 진행한다.
void flutterBlueInit() async {
  // 스캔 결과 listen
  print("스캔 시작");
  var subscription = FlutterBluePlus.onScanResults.listen(
    (results) {
      if (results.isNotEmpty) {
        ScanResult r = results.last; // the most recently found device
        print(
            '${r.device.remoteId}: "${r.advertisementData.advName}" found!');
        print("디바이스 : ");
        print(r.device);
        print("광고데이터 : ");
        print(r.advertisementData);
        device = r.device;
        connect_device(device);
      }
    },
    onError: (e) => print(e),
  );

  // 스캔 종료 시 위 listen 종료
  FlutterBluePlus.cancelWhenScanComplete(subscription);

  // 블루투스 활성화 및 권한 부여 테스트
  // In your real app you should use `FlutterBluePlus.adapterState.listen` to handle all states
  await FlutterBluePlus.adapterState
      .where((val) => val == BluetoothAdapterState.on)
      .first;

  // 스캔 시작 및 스캔 끝날때까지 기다리기
  await FlutterBluePlus.startScan(
      timeout: const Duration(seconds: 7),
      withServices: [Guid("6e400001-b5a3-f393-e0a9-e50e24dcca9e")]);
  await FlutterBluePlus.isScanning.where((val) => val == false).first;
}
- Scan 결과로 발견 성공 사진
- Connect
연결된 서비스에서 캐릭터리스틱을 조사하여 read와 write 플래그의 구분으로 Rx와 Tx 캐릭터리스틱을 구분하는 코드이다. read가 enabled 되어있는 캐릭터리스틱인 경우 피코에서 전송하는 Tx 특성이기 때문에 값을 읽어 저장할 필요가 있는데, 센서값이 주기적으로 들어올것으로 판단하여 해당 값을 구독(subscribe)하여 Notify 기능을 활성화하였다. 해당 기능을 활성화하면 값이 들어올때마다 listen 콜백 함수로 값을 알아서 읽어올 수 있어 해당 값으로 화면의 Text를 업데이트 해주었다. 해당 텍스트 위젯의 상태 관리 기법은 미리 생성해놓은 SensorDataProvider를 이용하였다.
void connect_device(device) async {
    // listen for disconnection
    var connectSubscription =
        device.connectionState.listen((BluetoothConnectionState state) async {
      if (state == BluetoothConnectionState.disconnected) {
        print("연결 끊김");
      }
    });

    // cleanup: cancel subscription when disconnected
    device.cancelWhenDisconnected(connectSubscription,
        delayed: true, next: false);

    // 해당 디바이스와 연결
    await device.connect().then((result) => print("연결 성공"));

    // 서비스 찾기
    List<BluetoothService> services = await device.discoverServices();
    print("찾은 서비스");
    print(services);
    print("=======================");
    for (var service in services) {
      // 캐릭터리스틱 읽기
      var characteristics = service.characteristics;
      for (BluetoothCharacteristic c in characteristics) {
        print("캐릭터리스틱 : ");
        print(c);
        print("=======================");
        if (c.properties.read) {
          List<int> value = await c.read();
        } else {
          // 쓰기
          write_characteristic = c;
        }

        final valueSubscription = c.onValueReceived.listen((value) {
          print("값 도착 $value");
          Provider.of<SensorDataProvider>(context, listen: true)
              .convertAscii(value);
        });

        // 연결 끊겼을때 subscribe 해제
        device.cancelWhenDisconnected(valueSubscription);

        // subscribe 설정 - Notify
        await c.setNotifyValue(true);
      }
    }
  }
Text(
	Provider.of<SensorDataProvider>(context, listen: true)
	    .display_data,
	style: Theme.of(context).textTheme.headlineMedium,
	),
- 연결 성공 및 서비스, 캐릭터리스틱 출력 사진
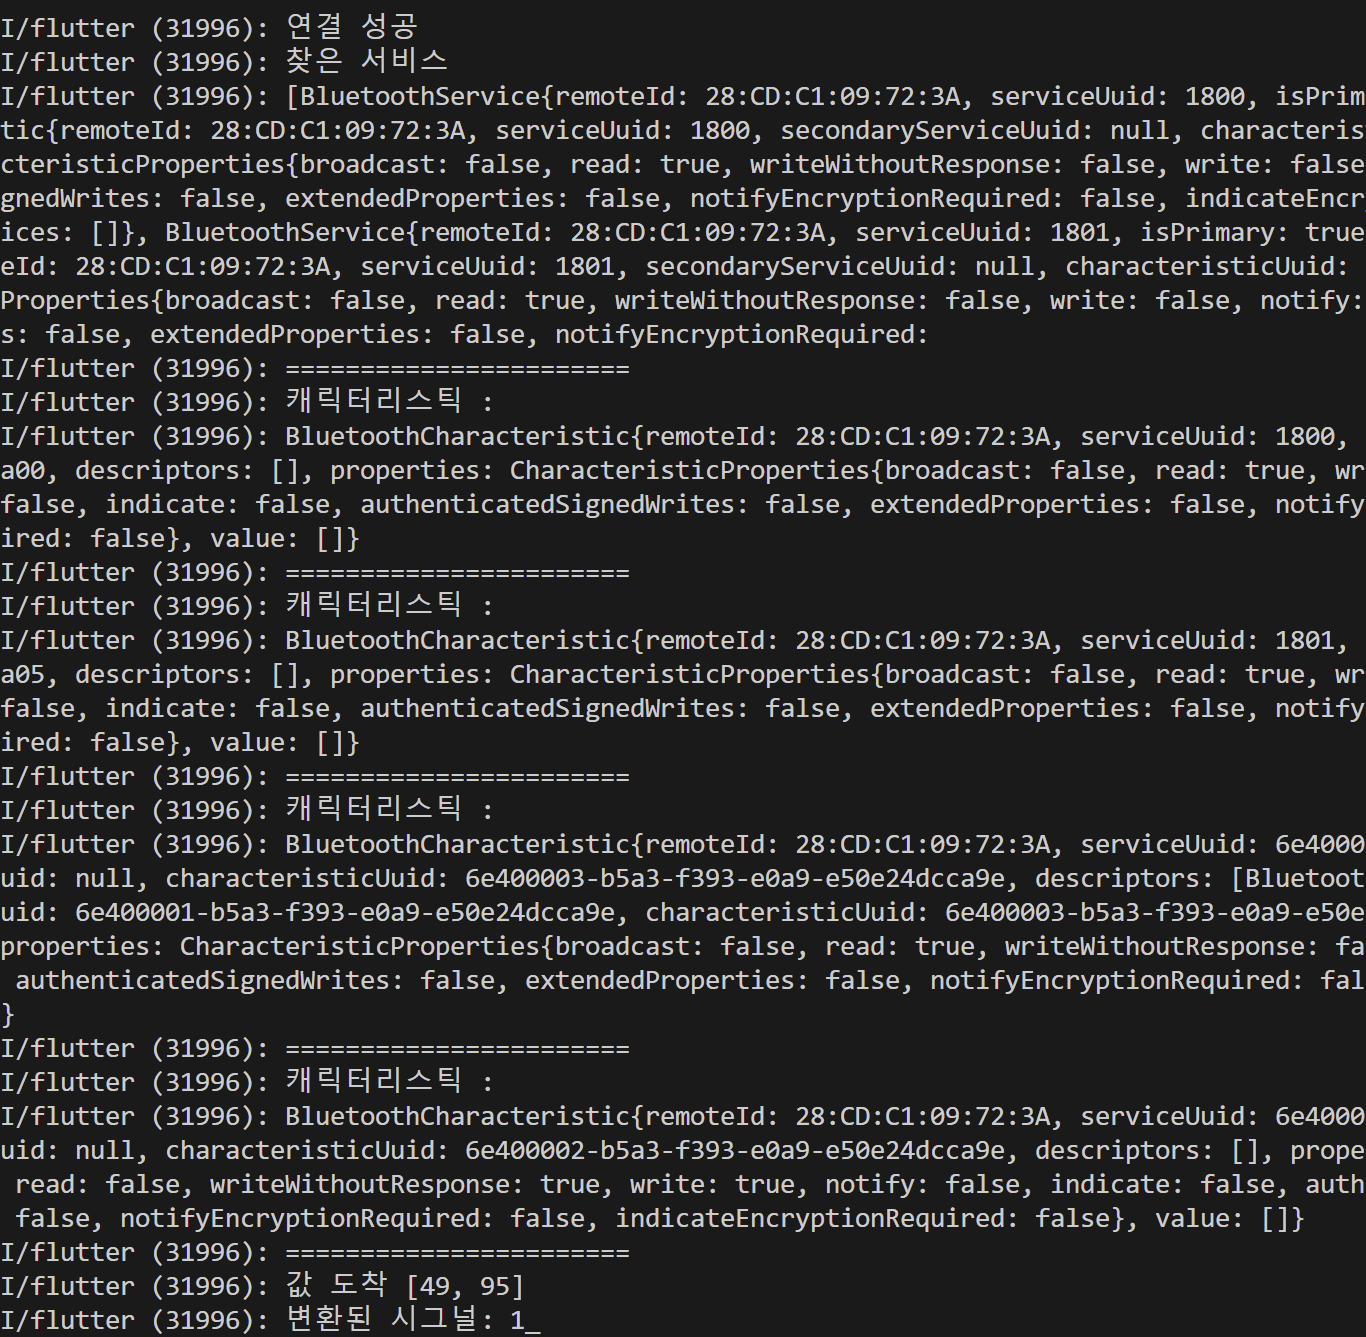
미리 지정해두었던 서비스 UUID와 캐릭터리스틱 UUID가 그대로 연결이 된것 확인.
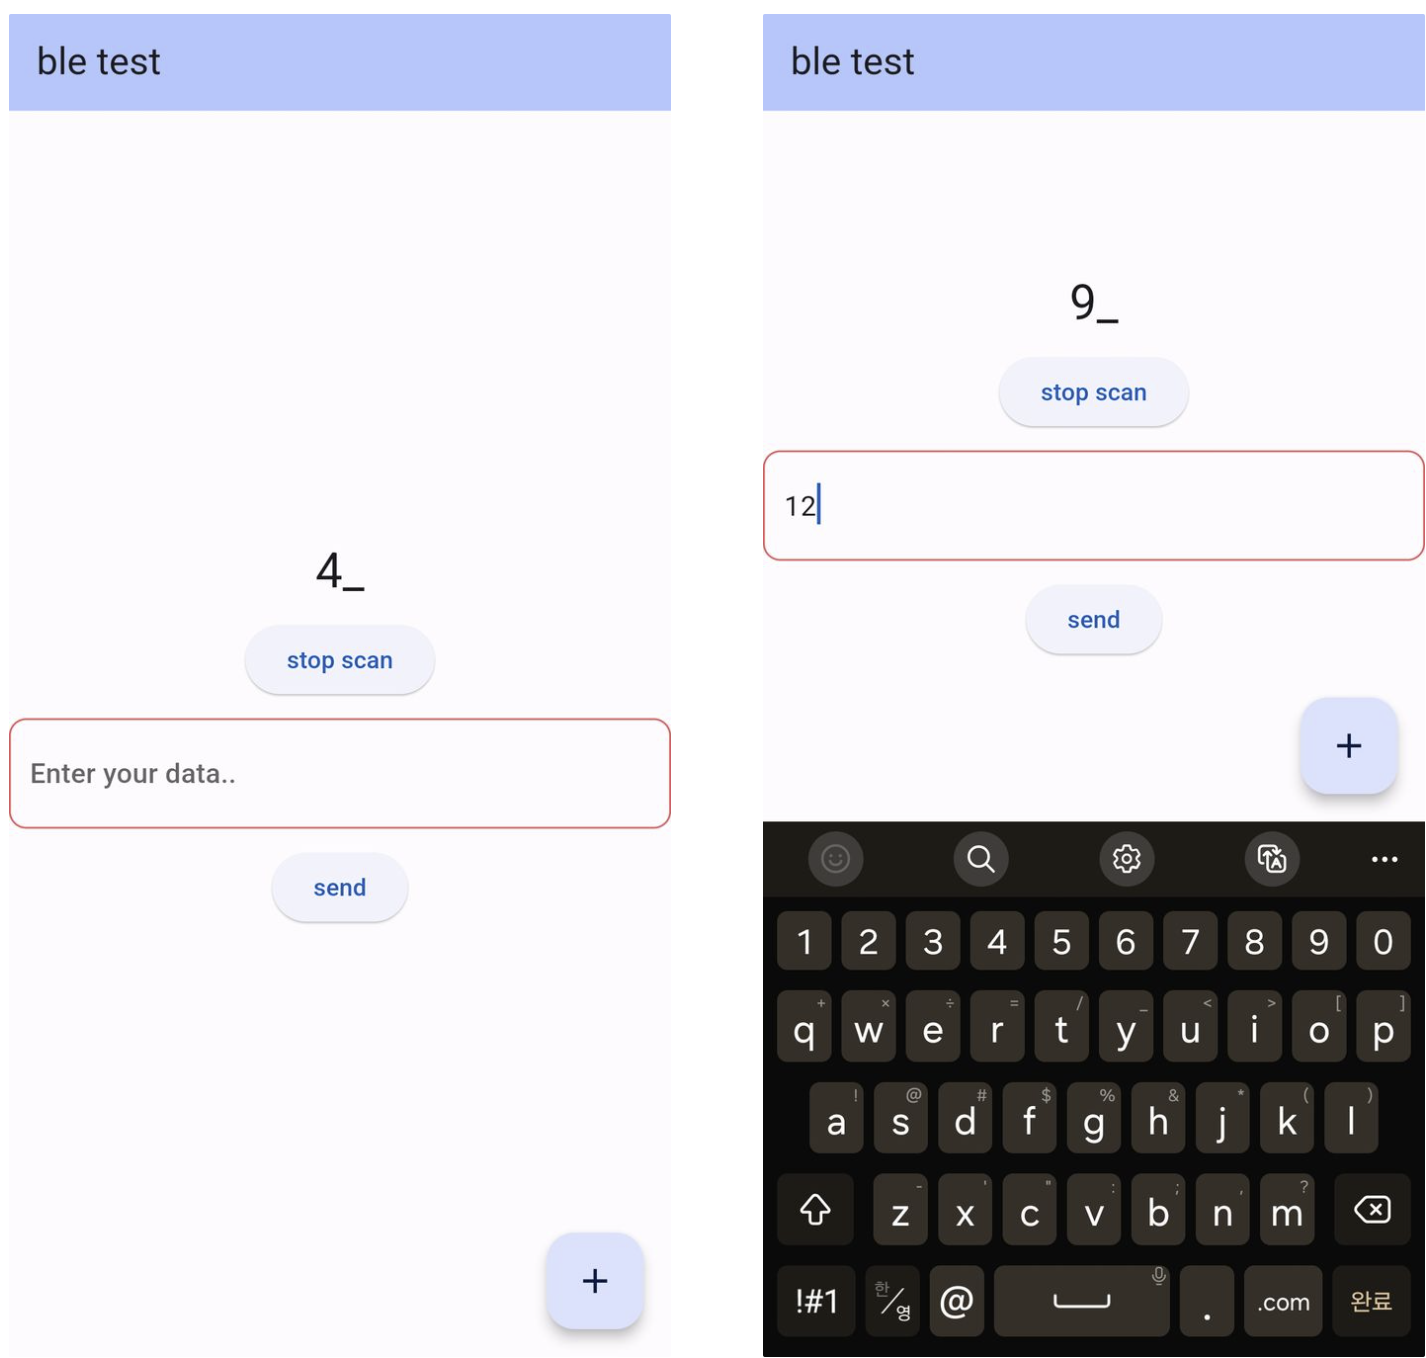
- write
반대로 flutter에서 값을 실어 피코쪽으로 보내기 위해선 피코의 Rx 캐릭터리스틱에 write 함수를 사용하여 값을 전송해주어야 한다. 따라서 TextField 위젯으로 입력받은 값을 컨트롤러를 이용하여 전달해주었으며, 해당 과정에서 write로 쓰이는 값은 Int형식을 지켜야하기 때문에 입력받은 숫자 문자열을 파싱하여 숫자로 바꿔주는 전처리 작업을 진행하였다.
TextField(
  controller: inputController,
  decoration: const InputDecoration(
    hintText: 'Enter your data..',
    labelStyle: TextStyle(color: Colors.redAccent),
    focusedBorder: OutlineInputBorder(
      borderRadius: BorderRadius.all(Radius.circular(10.0)),
      borderSide: BorderSide(width: 1, color: Colors.redAccent),
    ),
    enabledBorder: OutlineInputBorder(
      borderRadius: BorderRadius.all(Radius.circular(10.0)),
      borderSide: BorderSide(width: 1, color: Colors.redAccent),
    ),
    border: OutlineInputBorder(
      borderRadius: BorderRadius.all(Radius.circular(10.0)),
    ),
  ),
  keyboardType: TextInputType.emailAddress,
),
const SizedBox(
  height: 10.0,
  width: 30.0,
),
ElevatedButton(
	onPressed: () {
	  setState(() async {
	    print("작성한 값 : ${inputController.text}");
	    int parsedInt = int.parse(inputController.text);
	    // 숫자 int값만 전송가능.
	    await write_characteristic.write([parsedInt]);
	  });
	},
	child: const Text("send"))
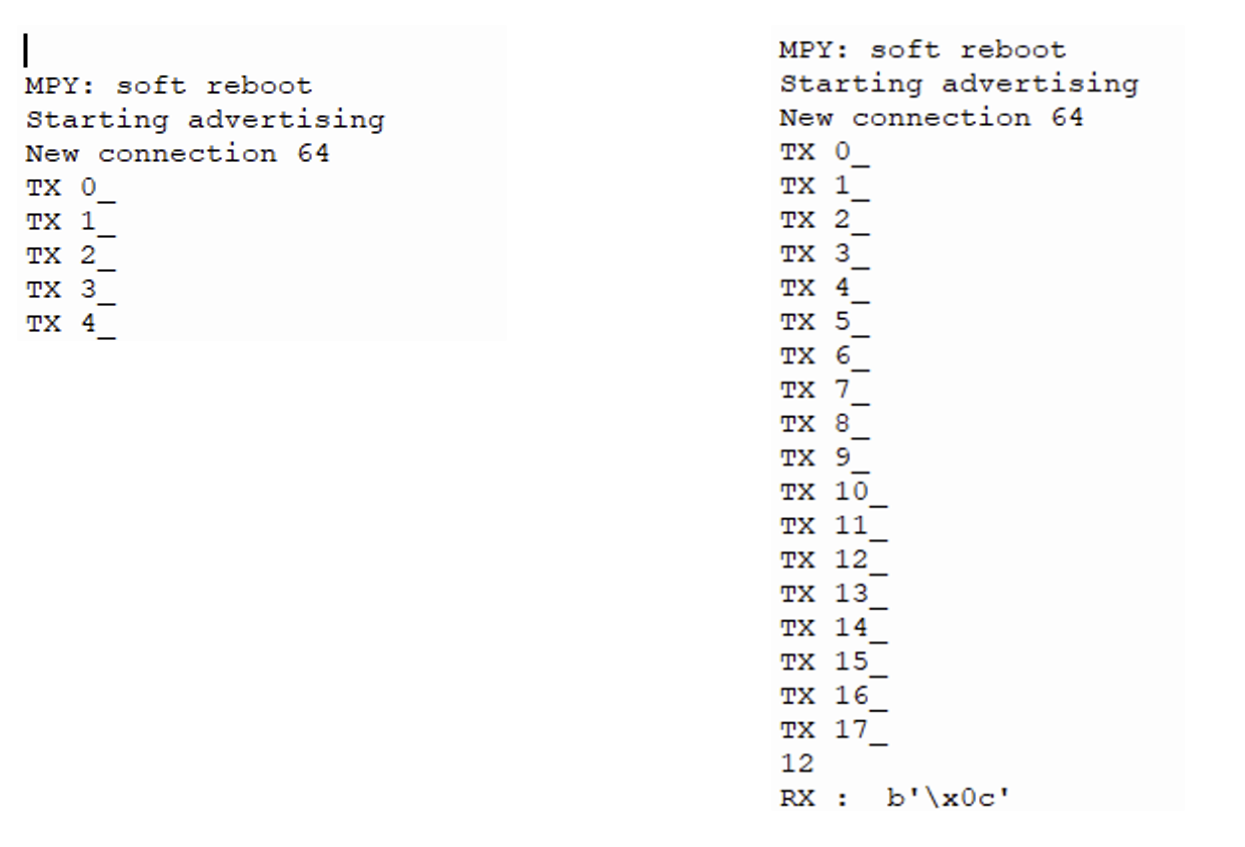
최종 작동
- Flutter 어플리케이션 작동
[피코로부터 데이터 수신 및 텍스트필드에 값 입력해서 전달]
- Pico Micropython
[Flutter로 카운트 값 송신하는 화면 및 수신 받은 값 출력(출력창)]
데이터셋 전처리 / 수면단계 모델 학습
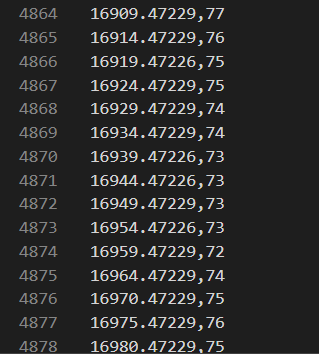
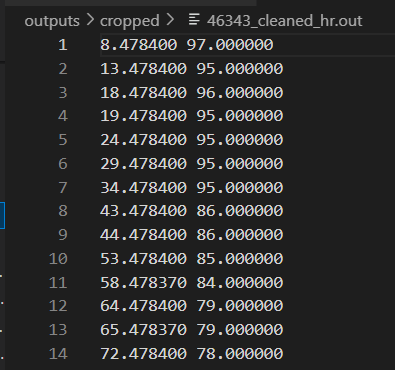
1. [subject-id-number]_heartrate.txt
- 심박수 (bpm)으로 Apple Watch에서 기록되고 테스트 대상자를 인덱스로 저장된 파일들이다.
- 해당 파일은 2개의 column으로 이루어져 있고 1열이 시간(초)이고 2열이 심박수이다.
- 학습시킬 때에 사용할 데이터셋은 이미 bpm이 구해져 있으므로 bpm을 구하는 과정은 필요치 않다.
- (4878,2) size의 데이터로 구성되어 있다.

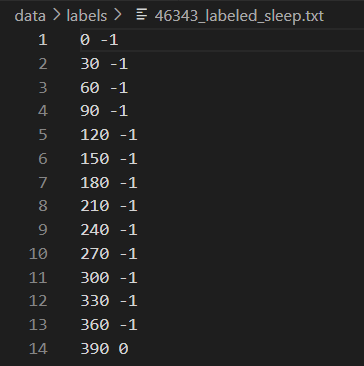
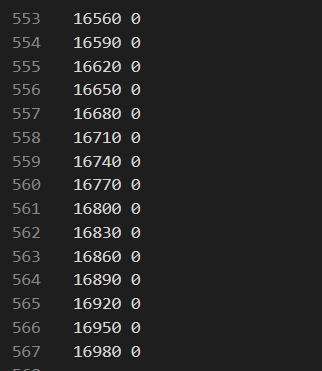
2. [subject-id-number]_labeled_sleep.txt
- 총 4.7시간 동안에 수면단계가 기록되어 있고 30초 간격으로 수면 단계가 판별된다.
- 라벨링된 수면단계로 다중 생리학적 신호 측정 결과로 기록된다.
- (567,2) size의 데이터로 구성되어 있다.
데이터셋 전처리
- 모든 시간대의 심박수가 수면단계로 매핑되는 것이 아니기 때문에 학습 이전에 전처리가 필요하다.
0. 심박수 데이터와 수면단계 데이터를 불러오기
- 심박수
def load_raw(subject_id):
        raw_hr_path = HeartRateService.get_raw_file_path(subject_id)
        heart_rate_array = HeartRateService.load(raw_hr_path, ",")
        heart_rate_array = utils.remove_repeats(heart_rate_array)
        return HeartRateCollection(subject_id=subject_id, data=heart_rate_array)
- 수면단계
def read_precleaned(subject_id):
        psg_path = str(utils.get_project_root().joinpath('data/labels/' + subject_id + '_labeled_sleep.txt'))
        data = []

        with open(psg_path, 'rt') as csv_file:
            file_reader = csv.reader(csv_file, delimiter=' ', quotechar='|')
            count = 0
            rows_per_epoch = 1
            for row in file_reader:
                if count == 0:
                    start_time = float(row[0])
                    start_score = int(row[1])
                    epoch = Epoch(timestamp=start_time, index=1)
                    data.append(StageItem(epoch=epoch, stage=PSGConverter.get_label_from_int(start_score)))
                else:
                    timestamp = start_time + count * 30
                    score = int(row[1])
                    epoch = Epoch(timestamp=timestamp,
                                  index=(1 + int(np.floor(count / rows_per_epoch))))

                    data.append(StageItem(epoch=epoch, stage=PSGConverter.get_label_from_int(score)))
                count = count + 1
        return PSGRawDataCollection(subject_id=subject_id, data=data)
1. 심박수 데이터와 라벨링된 수면단계 데이터의 시간 동기화
-
두 데이터셋의 시작 시간과 종료시간을 파악해 가장 늦게 끝나는 시간을 시작 시간으로
가장 빨리 끝나는 시간을 끝나는 시간으로 한다.
def get_intersecting_interval(collection_list):
        start_times = []
        end_times = []
        for collection in collection_list:
            interval = collection.get_interval()
            start_times.append(interval.start_time)
            end_times.append(interval.end_time)

        return Interval(start_time=max(start_times), end_time=min(end_times))
2. 동기화 된 시간을 기준으로 각 데이터들을 잘라내기
- 심박수
def crop(heart_rate_collection, interval):
        subject_id = heart_rate_collection.subject_id
        timestamps = heart_rate_collection.timestamps
        valid_indices = ((timestamps >= interval.start_time)
                         & (timestamps < interval.end_time)).nonzero()[0]

        cropped_data = heart_rate_collection.data[valid_indices, :]
        return HeartRateCollection(subject_id=subject_id, data=cropped_data)
- 수면단계
def crop(psg_raw_collection, interval):
        subject_id = psg_raw_collection.subject_id

        stage_items = []
        for stage_item in psg_raw_collection.data:
            timestamp = stage_item.epoch.timestamp
            if interval.start_time <= timestamp < interval.end_time:
                stage_items.append(stage_item)

        return PSGRawDataCollection(subject_id=subject_id, data=stage_items
3. 잘라진 데이터들
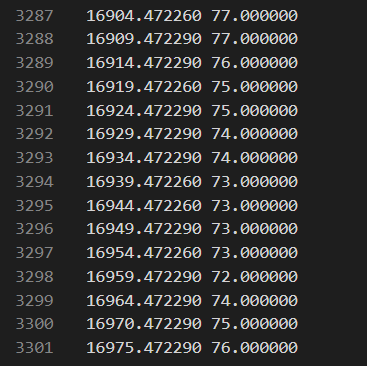
-
심박수의 경우 음수 영역에 해당되는 시간의 데이터들이 다 잘라나간 것을 확인할 수 있다.
하지만 여전히 1대1 매핑은 되지 않기에 추가적인 전처리가 필요하다.
-
심박수
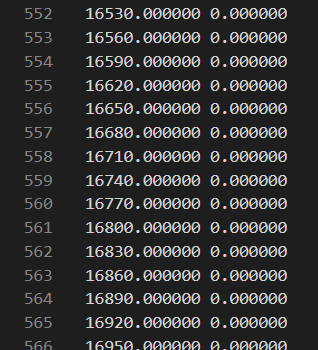
- 수면단계

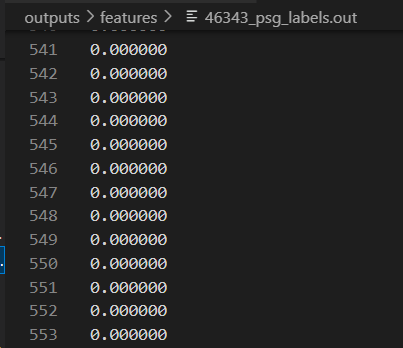
4. 유효한 epoch 찾기
- unscored 라벨링 데이터를 걸러내고 유효한 심박수 데이터 epoch만을 찾아낸다.
def get_valid_epoch_dictionary(timestamps, start_time):
        epoch_dictionary = {}

        for ind in range(np.shape(timestamps)[0]):
            time = timestamps[ind]
            floored_timestamp = time - np.mod(time - start_time, Epoch.DURATION)

            epoch_dictionary[floored_timestamp] = True

        return epoch_dictionary

 def get_valid_epochs(subject_id):

        psg_collection = PSGService.load_cropped(subject_id)
        heart_rate_collection = HeartRateService.load_cropped(subject_id)

        start_time = psg_collection.data[0].epoch.timestamp
        hr_epoch_dictionary = RawDataProcessor.get_valid_epoch_dictionary(heart_rate_collection.timestamps,
                                                                          start_time)

        valid_epochs = []
        for stage_item in psg_collection.data:
            epoch = stage_item.epoch

            if epoch.timestamp in hr_epoch_dictionary \
                    and stage_item.stage != SleepStage.unscored:
                valid_epochs.append(epoch)

        return valid_epochs
5. 선형보간을 통해 유효 epoch에 해당하는 라벨링 데이터를 찾기
def build(subject_id, valid_epochs):
        psg_array = PSGService.load_cropped_array(subject_id)
        labels = []
        for epoch in valid_epochs:
            value = np.interp(epoch.timestamp, psg_array[:, 0], psg_array[:, 1])
            labels.append(value)
        return np.array(labels)
6. 심박수 데이터 보간 및 가우시안 정규화
- 가우시안 정규화
def convolve_with_dog(y, box_pts):
    y = y - np.mean(y)
    box = np.ones(box_pts) / box_pts

    mu1 = int(box_pts / 2.0)
    sigma1 = 120

    mu2 = int(box_pts / 2.0)
    sigma2 = 600

    scalar = 0.75

    for ind in range(0, box_pts):
        box[ind] = np.exp(-1 / 2 * (((ind - mu1) / sigma1) ** 2)) - scalar * np.exp(
            -1 / 2 * (((ind - mu2) / sigma2) ** 2))

    y = np.insert(y, 0, np.flip(y[0:int(box_pts / 2)]))  # 한계조건 고려
    y = np.insert(y, len(y) - 1, np.flip(y[int(-box_pts / 2):]))
    y_smooth = np.convolve(y, box, mode='valid')

    return y_smooth
- 심박수 보간
def interpolate_and_normalize(heart_rate_collection):
        timestamps = heart_rate_collection.timestamps.flatten()
        heart_rate_values = heart_rate_collection.values.flatten()
        interpolated_timestamps = np.arange(np.amin(timestamps),
                                            np.amax(timestamps), 1)
        interpolated_hr = np.interp(interpolated_timestamps, timestamps, heart_rate_values)

        interpolated_hr = utils.convolve_with_dog(interpolated_hr, HeartRateFeatureService.WINDOW_SIZE)

        scalar = np.percentile(np.abs(interpolated_hr), 90)
        interpolated_hr = interpolated_hr / scalar

        return interpolated_timestamps, interpolated_hr
7. 심박수 최종 전처리
- 심박수 사이클 내에서 첫 번째 값에 타임 스탬프에 해당하는 값을 택한다. WINDOW_SIZE로 사이클의 크기를 결정한다.
- 최종적으로 표준편차를 적용한다.
def build_from_collection(heart_rate_collection, valid_epochs):
        heart_rate_features = []

        interpolated_timestamps, interpolated_hr = HeartRateFeatureService.interpolate_and_normalize(
            heart_rate_collection)

        for epoch in valid_epochs:
            indices_in_range = HeartRateFeatureService.get_window(interpolated_timestamps, epoch)
            heart_rate_values_in_range = interpolated_hr[indices_in_range]

            feature = HeartRateFeatureService.get_feature(heart_rate_values_in_range)

            heart_rate_features.append(feature)

        return np.array(heart_rate_features)

    @staticmethod
    def get_window(timestamps, epoch):
        start_time = epoch.timestamp - HeartRateFeatureService.WINDOW_SIZE
        end_time = epoch.timestamp + Epoch.DURATION + HeartRateFeatureService.WINDOW_SIZE
        timestamps_ravel = timestamps.ravel()
        indices_in_range = np.unravel_index(np.where((timestamps_ravel > start_time) & (timestamps_ravel < end_time)),
                                            timestamps.shape)
        return indices_in_range[0][0]
8. 코사인 특성 추출
- 시계열 데이터 특히 비슷한 패턴이 반복되는 심박수 데이터의 특성을 살리기 위해 코사인 특성을 추출해 학습에 이용한다.
def cosine_proxy(time):
	sleep_drive_cosine_shift = 5
	return -1 * np.math.cos((time - sleep_drive_cosine_shift * Constants.SECONDS_PER_HOUR) *
                              2 * np.math.pi / Constants.SECONDS_PER_DAY)

def build_cosine(valid_epochs):
   features = []
   first_timestamp = valid_epochs[0].timestamp
   for epoch in valid_epochs:
          value = TimeBasedFeatureService.cosine_proxy(epoch.timestamp - first_timestamp)
          features.append(value)
    return np.array(features)
9. 시간 특성 추출
def build_time(valid_epochs):
        features = []
        first_timestamp = valid_epochs[0].timestamp
        for epoch in valid_epochs:
            value = epoch.timestamp - first_timestamp

            value = value / 3600.0

            features.append(value)
        return np.array(features)
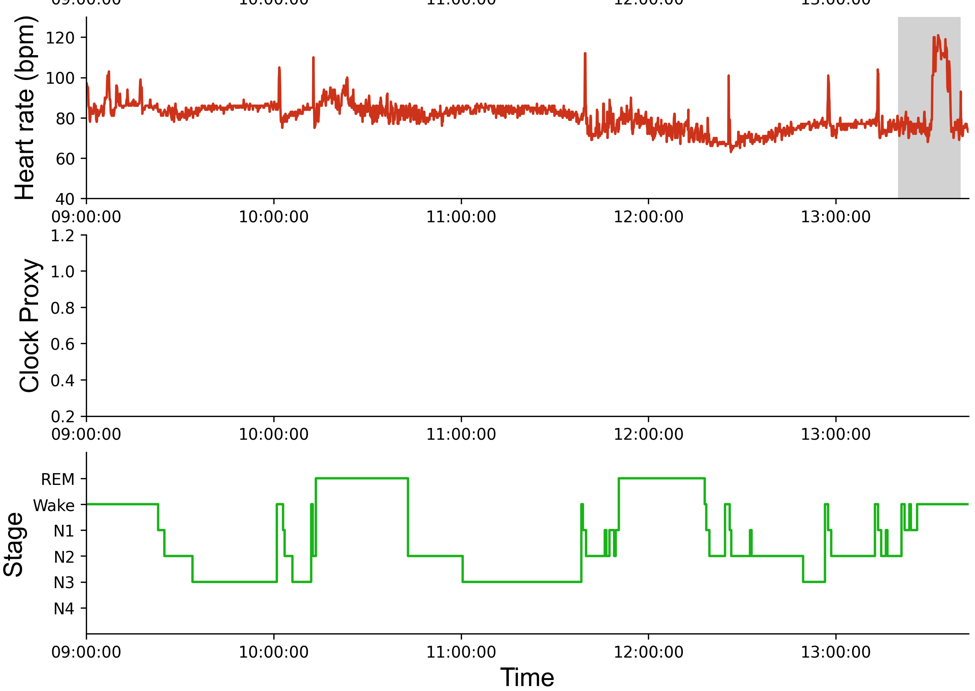
전처리 결과 및 그래프
- 심박수와 라벨링이 매핑된 것을 확인할 수 있다.

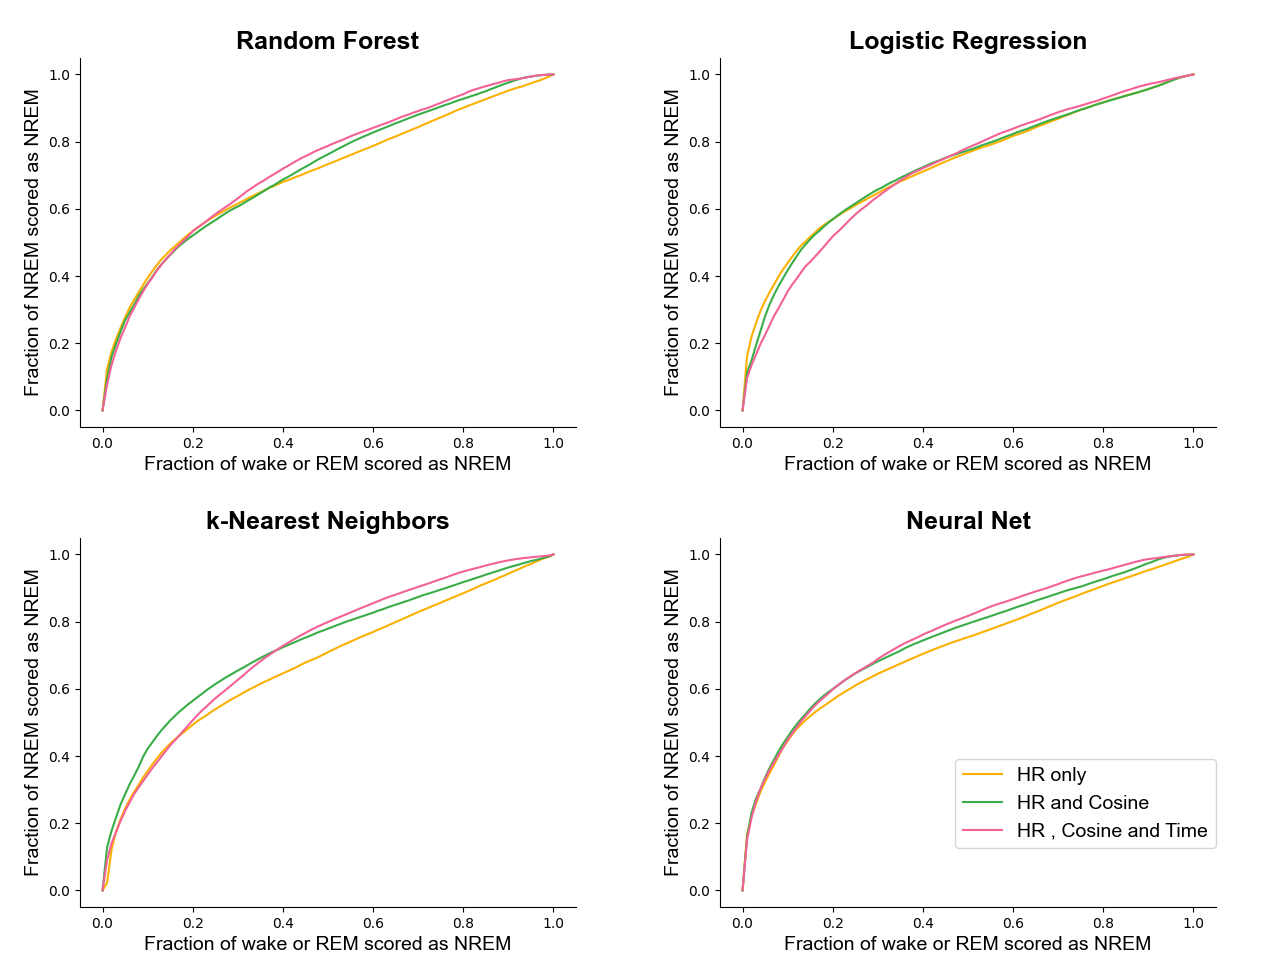
학습 및 결과
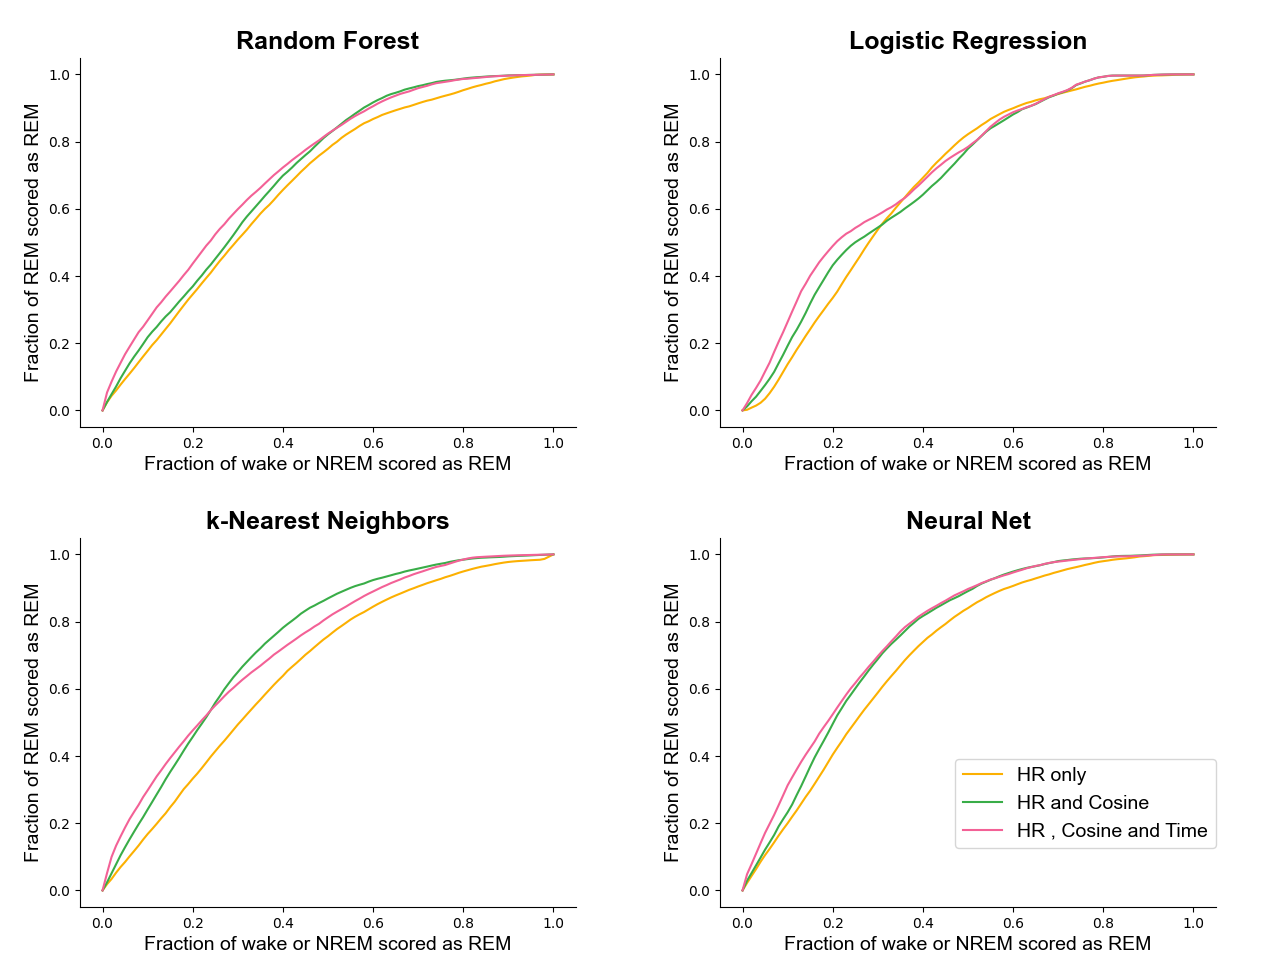
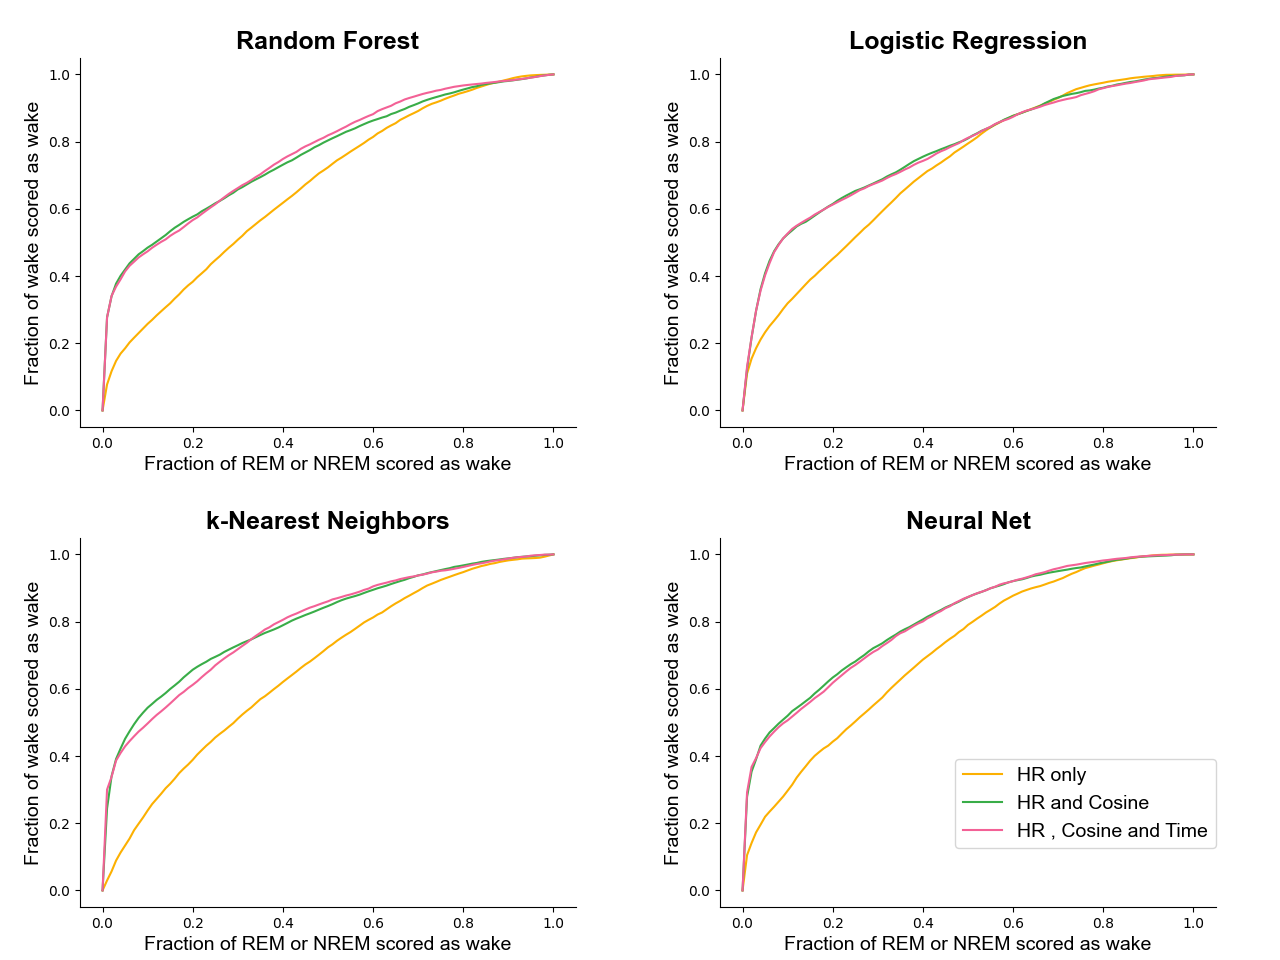
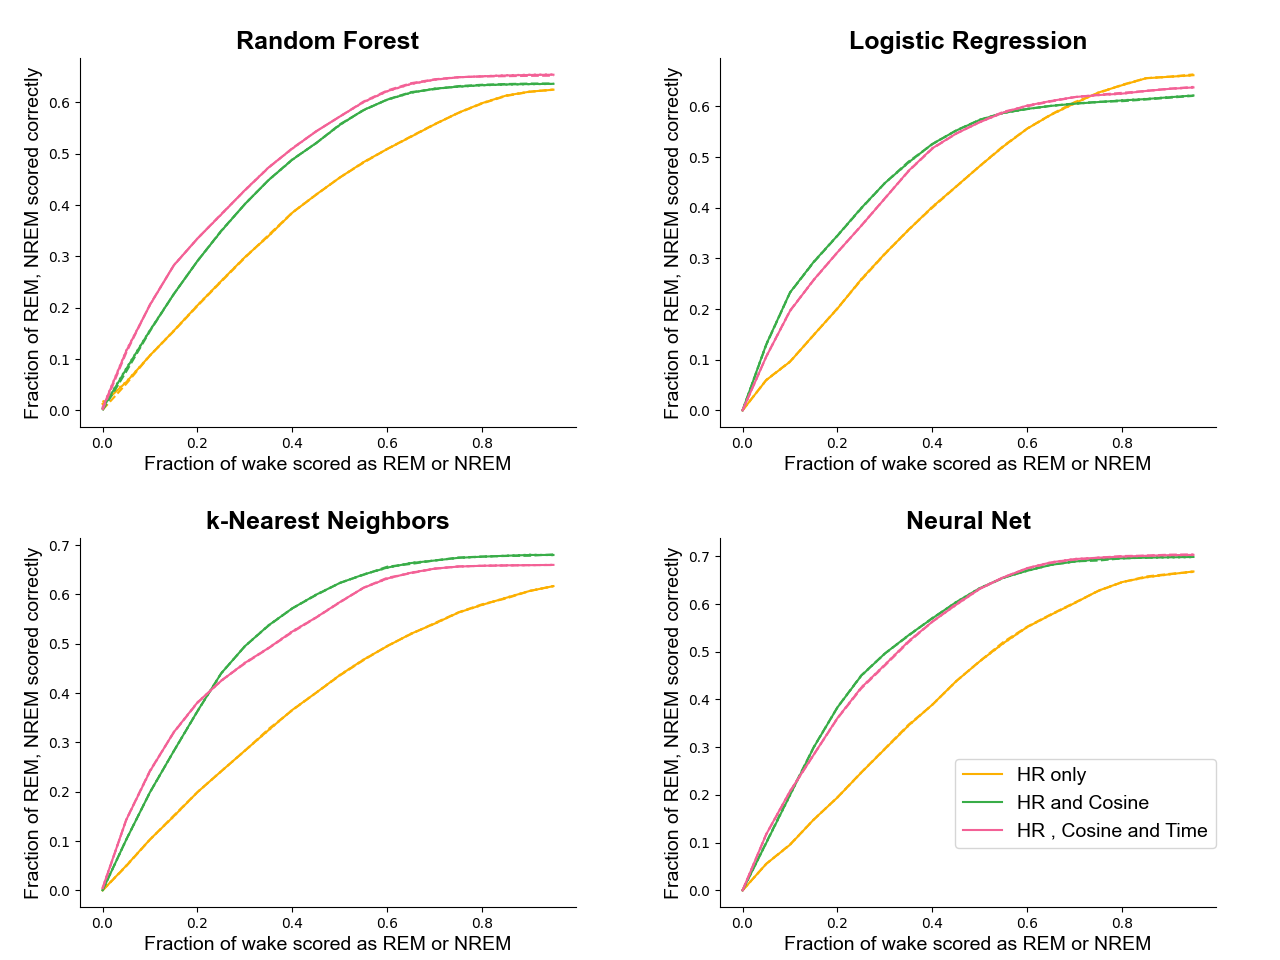
- 3개의 경우에 대해서 4개의 학습 방법으로 학습을 진행하였고 결과를 비교하였다.
경우
-
심박수만
-
심박수 and 코사인
-
심박수, 코사인 and 시간
def get_label(feature_set: [FeatureType]):
        if set(feature_set) == {FeatureType.heart_rate}:
            return 'HR only'
        if set(feature_set) == {FeatureType.heart_rate, FeatureType.cosine}:
            return 'HR and Cosine'
        if set(feature_set) == {FeatureType.heart_rate, FeatureType.cosine, FeatureType.time}:
            return 'HR , Cosine and Time'
학습 방법
-
랜덤 포레스트
-
로지스틱 회귀
-
K-최근접 이웃
-
신경망(relu, 히든 레이어 3개, adam 옵티마이저)
def get_classifiers():
    return [AttributedClassifier(name='Random Forest',
                                 classifier=RandomForestClassifier(n_estimators=100, max_features=1.0,
                                                                   max_depth=10,
                                                                   min_samples_split=10, min_samples_leaf=32,
                                                                   bootstrap=True)),
            AttributedClassifier(name='Logistic Regression',
                                 classifier=LogisticRegression(penalty='l1', solver='liblinear', verbose=0,
                                                               multi_class='auto')),
            AttributedClassifier(name='k-Nearest Neighbors',
                                 classifier=KNeighborsClassifier(weights='distance')),
            AttributedClassifier(name='Neural Net',
                                 classifier=MLPClassifier(activation='relu', hidden_layer_sizes=(15, 15, 15),
                                                          max_iter=2000, alpha=0.01, solver='adam', verbose=False,
                                                          n_iter_no_change=20))]
결과 and 그래프
- 결과
| 방법 | 경우 | WAKE | NREM | REM | BEST_ACC |
|---|---|---|---|---|---|
| 랜덤 포레스트 | 심박수 | 0.6 | 0.385 | 0.386 | 0.671 |
| 랜덤 포레스트 | 심박수,코사인 | 0.6 | 0.488 | 0.489 | 0.635 |
| 랜덤 포레스트 | 심박수,코사인,시간 | 0.6 | 0.51 | 0.511 | 0.661 |
| 로지스틱 회귀 | 심박수 | 0.6 | 0.402 | 0.4 | 0.7 |
| 로지스틱 회귀 | 심박수,코사인 | 0.6 | 0.526 | 0.525 | 0.703 |
| 로지스틱 회귀 | 심박수,코사인,시간 | 0.6 | 0.518 | 0.517 | 0.703 |
| K-최근접 이웃 | 심박수 | 0.6 | 0.366 | 0.355 | 0.662 |
| K-최근접 이웃 | 심박수,코사인 | 0.6 | 0.572 | 0.572 | 0.701 |
| K-최근접 이웃 | 심박수,코사인,시간 | 0.6 | 0.525 | 0.524 | 0.718 |
| 신경망 | 심박수 | 0.6 | 0.389 | 0.389 | 0.702 |
| 신경망 | 심박수,코사인 | 0.6 | 0.57 | 0.571 | 0.714 |
| 신경망 | 심박수,코사인,시간 | 0.6 | 0.563 | 0.563 | 0.723 |
- NREM 정확도
- REM 정확도
- WAKE 정확도
- 종합 정확도
flutter 환경에서 tflite 파일 이식하기
본 코드에서는 위와 같은 오류가 있다.

지난 주 개발에서 작동이 잘 안되는 문제를 발견 할 수 있었다.
문제를 해결하기 위해 어떤 것이 원인 인지 확인 하려 했다.
예상의 문제점 후보
- input tensor의 모양의 불일치
- 에뮬레이터 자체의 문제
- tflite_flutter에서 동작하지 않는 연산자
1. input tensor의 문제
input tensor의 모양이 모델의 input layer와 맞지않아 발생할 수 있는 문제가 있을 것 같아 코드의 input tensor 모양을 [1,1,36]을 [1,36]으로 수정을 해보았다.
var input = List.generate(
    1, (_) => List.generate(1, (_) => List.filled(36, 0.0)));
기존 [1,1,36]의 tensor
var input = List.generate(1, (_) => List.filled(36, 0.0));
변경한 [1,36] tensor

결과: tensor 모양은 [1,1,36]으로 하는 것이 맞기에 이에 대한 오류는 아니였다.
2. 에뮬레이터 자체의 문제
tflite_flutter의 설명을 보면 구동기기에 초기 셋팅을 해주어야하기 때문에 문제가 발생 할 수 있다는 근거가 있었다.
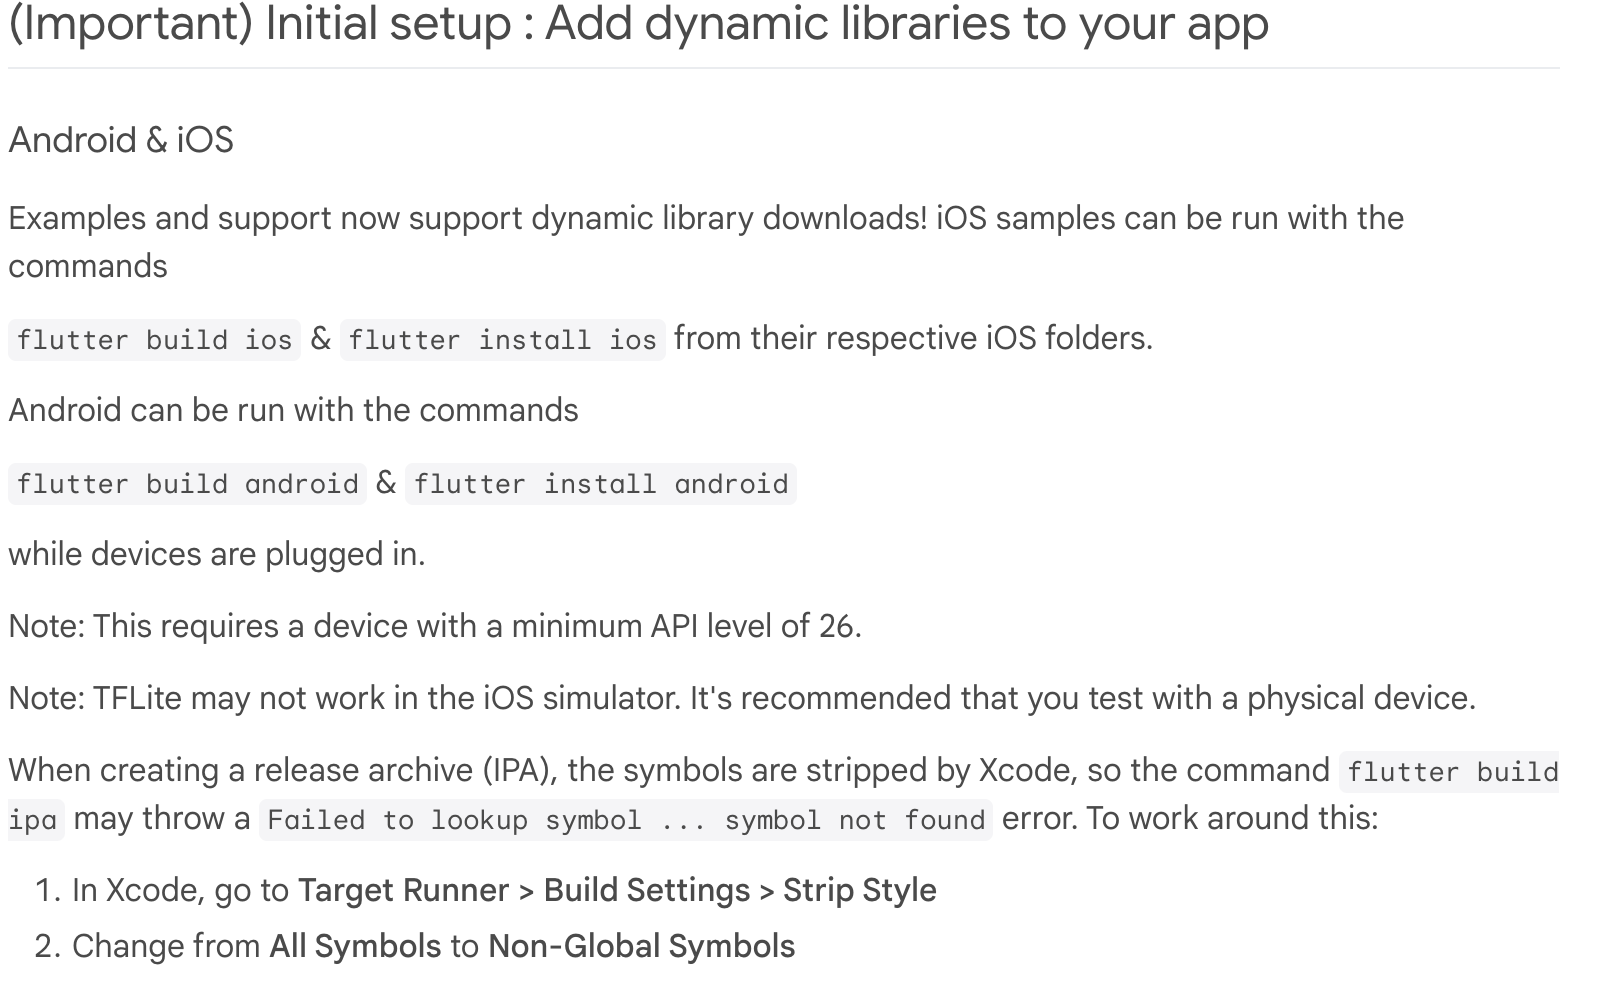
초기셋팅에 대한 설명
이 때문에 github의 다른 tflite_flutter 코드를 실행을 시켜보았다.
https://github.com/adityojulian/LFTrack
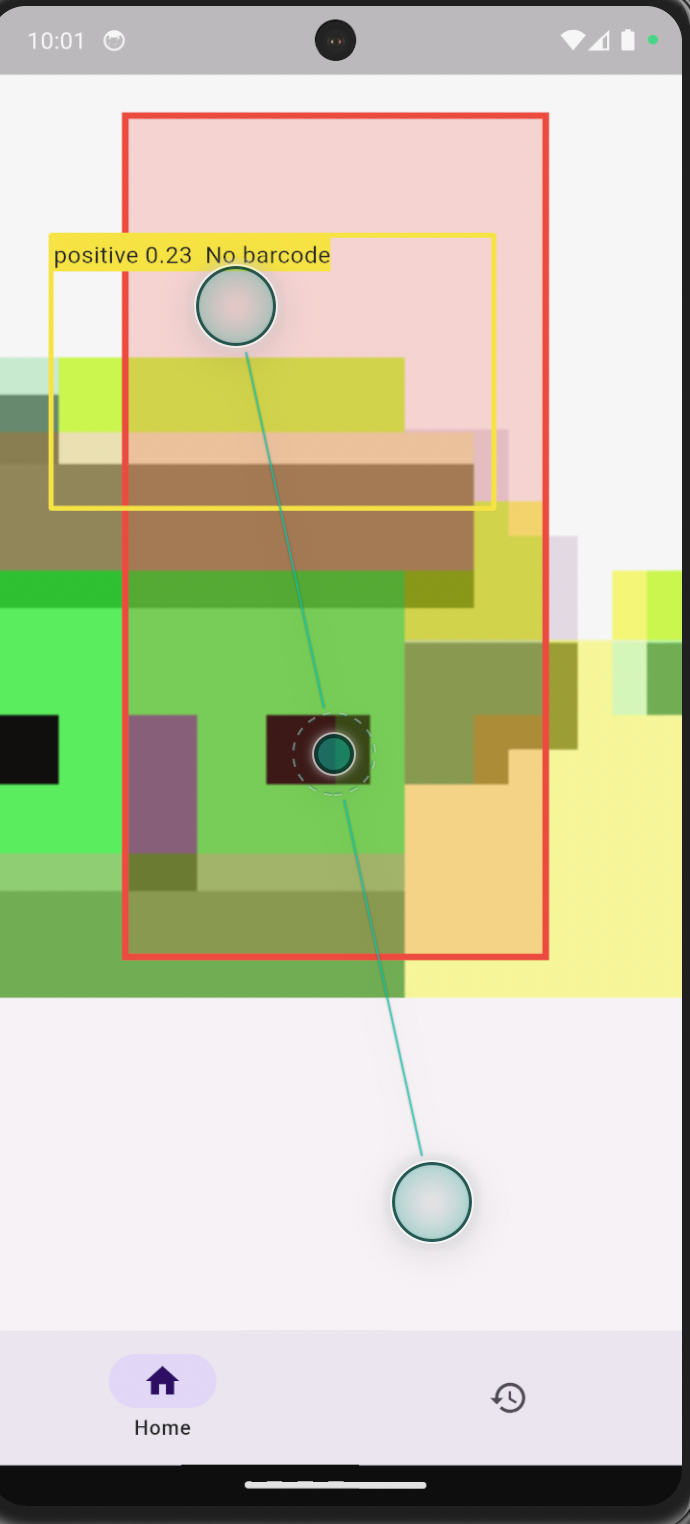
정상 작동된 화면
결론: 다른 tflite_flutter 코드는 정상 작동하였음. 즉 에뮬레이터 자체의 한계점에 대한 문제는 아니였다.
3. 연산자가 flutter에서 동작하지 않음.
chat gpt의 답변을 보면 tensorflowlite에서 지원 하지 않는 연산자를 사용할 가능성이 높다고 나와있음. 하지만 파이썬에서는 정상작동을 하였음을 확인했다.
결론: 결국에는 연산자에 대한 문제이기 때문에 모델을 직접만드는 방법이나 플러터에서 python을 직접 구동하는 방법 등을 생각해보아야한다.
To do
-
블루투스 BLE 기반 앱-피코 통신 환경은 완성이 되었다. 이제 PPG 센서가 배송완료되면 전처리 코드를 피코 플랫폼의 마이크로파이썬 스크립트와 결합할 작업이 남았음.
전처리가 많이 어려움을 겪고 있는데, 아무래도 성능 개선을 위한 중요한 파트인만큼 차주부터는 전처리 파트를 함께 작업할 것이다. -
단순한 Classifier로 학습을 진행할 경우에 정확도가 낮음을 확인하였다. pytorch로 lstm과 같은 rnn 모델 혹은 트랜스포머 모델을 통해 학습을 진행하고자 한다.